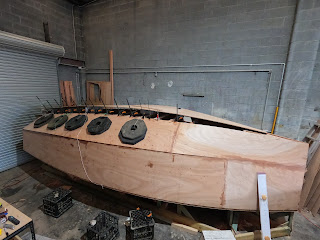
I planked the hull between October 2021 and January 2022. From memory, I was doing some part-time work during this period, so I likely spent about 2-3 days per week working on the boat. Most of the hard work was done in October and November. I recall December being a really sweltering hot month, which meant I often worked in short bursts to cope with the suffocating humidity of summer in Brisbane. My friend Ian White helped me a lot during this stage.
I planked the hull from the bottom to the top. Remember, at this stage, the boat was still on the strongback jig upside down. The plywood for hull planking in the kit comes in several sections, which were joined with butt blocks. I installed the first hull side by attaching individual plywood pieces to the frames. Then I crawled inside the boat and glued the butt joint panels in place. While this approach allowed me to do the work by myself since the individual panels were of size I could physically handle, this proved to be a bit cumbersome method.
For most of the remaining panel sections, I pre-assembled entire panel sections from stern to bow with butt blocks epoxied in place. I also pre-drilled holes where the screws needed to go. I enlisted the help of my friend Ian and a few other people (thank you, Annika, Thommo & Jeremy). With extra pairs of hands, we lifted the entire panel section, aligned them with the frames and stringers, and while the assistants held them in place, I went around with a power drill to install screws. This approach worked really well when people were available to help and for relatively flat hull sections. I also needed to consider the time it took before mixing epoxy and completing panel installation as the ambient temperature in Brisbane is often around 30°C or even hotter, so that means a short working time of 20-30 minutes even with an extra slow hardener.
The bottom chine panels towards the bow, which needed to be twisted, were still installed as a single individual piece as it was easier to bend them this way and use clamps to ensure they conformed to the nice hull shape towards the bottom of the bow stem. For chine panels at the stern we also placed heavy weight blocks on top (attached with ropes).
Once all the panels were epoxied on the frames and stringers it was again time to pick up a plane and sanding blocks to shave off excess plywood and round the corners prior to taping the joins.


No comments:
Post a Comment