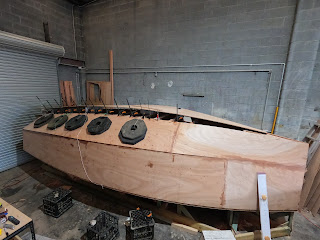
Sunday, December 18, 2022

Moving to a new boatyard

So, around December 2022, I moved from the Ocean Crusaders yard location in Hemmant to Multihull Marine in Ransome. I'll forever be grateful to Annika and Thommo who provided me with shed space to be able to kickstart my dream of building a Globe 5.80 sailboat. Their support and initial encouragement were a catalyst that helped me to believe I could achieve this goal and commit to it. The shed space in Hemmant was also fantastical in all aspects; it was indoor and dry, with a fantastic community of people who were often around to help me out. Annika and Thommo completed the rebuild of their TP52 J-Bird project and had to move out / downsize from that shed space. It was time to find a new location and move my boat there.

It took me a few weeks to find out a new location. I made several enquiries around for available shed space. However, all places were commercial worksheds with sky-high rents that were absolutely out of budget. My friend Christine finally told me about Multihull Marine Boat Yard, which is luckily only a 10-minute drive from my house. I drove to the yard one day to check it out and see if they had any available space. I was pleasantly surprised by how neat the boatyard was and went into the office to talk to someone. I met Damien, who manages the place, and he was probably equally surprised to have a woman ask about bringing her boat there. Luckily, he had a few outdoor spaces available, which he showed me, and the rent was reasonable, too. I picked the spot he said is least likely to flood; fingers crossed.

Next I needed to arrange transportation of my boat to the new location. I estimated the drive would take a maximum of 30 minutes plus the loading and offloading time, so it did not seem like something that would be difficult to organise. I contacted several companies to hire a flatbed truck with a crane and to my surprise, only one eventually reluctantly and quite rudely told me there's no chance he'll do the job. I called the guy to figure out what the issue was, and he told me that because it was a timber boat, it was basically too risky to move. So, in a way, it's an insurance problem. I thanked the man for his feedback so I at least understood what the issue was. I considered a few more creative transportation ideas, including hiring a truck and getting a friend with a truck license to drive it or the option of hiring one of those U-haul car transport trailers. Those were dead ends. I was running out of time, and then my husband had a brilliant idea. One Friday night, he said, "Why don't you put the job on Airtasker?" Pff, not sure if boat transport is the usual thing people put on Airtasker, but I thought, eh, what the hell, let's do it. In less than an hour, I exchanged a few messages with some bloke with a truck who was willing to do the job the following morning for a perfectly reasonable price.

So one fine Saturday morning, me and my friend, who supposedly had some experience with trucks, went down to the boatyard to get everything ready for transportation. Some 20-something, rather young-looking bloke turned up with a truck. I would think he was barely qualified to drive a car without learner plates. But, he was there, polite and professional, with (clearly) his boss' truck and unphased by my nervousness about the risks of transporting my precious baby. My friend and I took the responsibility of loading the boat up in our hands. We secured her with strong ratchet straps, blocked the cradle wheels and away we went. I instructed the young man to drive so carefully as if he were transporting a million-dollar cargo, and I followed him in my car. The 20-minute slow drive to the new boatyard went without any troubles apart from me sweating and nearly having a heart attack at every turn. At the new yard, all the stress rolled off my chest, and the truck driver offloaded my boat with a crane and a big smile on his face. Everything was well, the boat was at the new yard, secured with a tarp to keep her dry. A few days later I returned and constructed an A-frame out of scrap timber from the strongback. Once the tarp was stretched over the frame I was able to resume working on the boat.


Monday, September 5, 2022

Hull Flipping

The video tells the story of how we flipped the hull. The hull was flipped in September 2022. We loaded her on a shop cradle with sturdy wheels, so I was able to push the boat around by hand.


Friday, August 12, 2022

Hull Fairing

Okay, this part of the boat build is, in fact, absolute torture, and you quickly find out you have very few friends who love you enough to come help :-P

I worked on fairing between April and August 2022. Yep... five months. This part of the boat build was frustratingly slow. It just didn't move anywhere. To be fair, I spent some time volunteering after severe weather in Brisbane between February and April 2022, then I spent a few weeks job hunting, and in June 2022, I started a new job. So this was a period of adjustment, and I had less time to work on the boat; hence, things were getting delayed.

What's so god awful about fairing... well everything from start to finish for an amateur to be honest. Prepare for your back to hurt from your neck down to your bottom. In the beginning, I was terrible at applying the fairing compound evenly, which meant the job of sanding it was that much worse. You have to sand the fairing with a long sanding board to get an even finish. I had to repeat the process of applying the fairing and sanding it down a few times to get an even smooth finish with no low areas. I can't actually decide which part of the sanding job was worst: the sides where you have to twist your body sideways, the chines that are hard to reach, and you kinda need to stand between two ladders to get a good range of movement or the hull bottom where you kneel or your knees bent forward like you're scrubbing the floor for hours.

My two sailing friends Christine and Jeanie finally came to my rescue towards the end and with joint effort we were able to get the fairing job finished.

I had the boat under a gazebo tent to minimise dust spreading, so I often worked inside a dust cloud in a humid tent. A good respirator mask is an absolute must for this, at least for me. There were a few times when I took the respirator off for short periods of time, e.g. to answer a phone call or talk to someone. Whenever I did that, I ended up not being able to sleep that night because I was coughing and wheezing for the next 24 hours.


Thursday, January 20, 2022

Rudder Fabrication

For my rudder fabrication, I engaged Peter Kerr, a highly experienced professional boatbuilder who owns and operates Deagon Slipways north of Brisbane. I'm really pleased I engaged Peter, as he was able to share valuable knowledge on foil design and how they perform under different conditions.

The plywood kit includes a rudder template, and I originally intended to laminate 5-6 layers of plywood to create the rudder. Peter instead recommended that we fabricate the rudder out of solid timber to ensure it's more robust. Peter also recommended combining two different types of timber to achieve the best balance between strength and weight. The leading and trailing edge and the centre are thus "crows ash" (light colour timber), which is stronger and offers better impact resistance, and the rest is cedar, which is also renowned as an excellent boatbuilding timber.

The fabrication process involved laminating the timber sections into a single block, tracing the rudder template on the laminated block and a lot of shaping to get the right teardrop profile. Watching Peter shape the timber into a foil shape with a hand plane was like watching an artist at work. I was able to "apprentice" and observe at his workshop for a few days, which was also a really cool learning experience, and his tradesmen shared many useful tips on how to get the various jobs done as efficiently as possible. We finished off the rudded by using an epoxy-based timber sealant, fiberglassing it with quadraxial fiberglass cloth and fairing.


Saturday, January 15, 2022

Planking the Hull

I planked the hull between October 2021 and January 2022. From memory, I was doing some part-time work during this period, so I likely spent about 2-3 days per week working on the boat. Most of the hard work was done in October and November. I recall December being a really sweltering hot month, which meant I often worked in short bursts to cope with the suffocating humidity of summer in Brisbane. My friend Ian White helped me a lot during this stage.

I planked the hull from the bottom to the top. Remember, at this stage, the boat was still on the strongback jig upside down. The plywood for hull planking in the kit comes in several sections, which were joined with butt blocks. I installed the first hull side by attaching individual plywood pieces to the frames. Then I crawled inside the boat and glued the butt joint panels in place. While this approach allowed me to do the work by myself since the individual panels were of size  I could physically handle, this proved to be a bit cumbersome method.

For most of the remaining panel sections, I pre-assembled entire panel sections from stern to bow with butt blocks epoxied in place. I also pre-drilled holes where the screws needed to go. I enlisted the help of my friend Ian and a few other people (thank you, Annika, Thommo & Jeremy). With extra pairs of hands, we lifted the entire panel section, aligned them with the frames and stringers, and while the assistants held them in place, I went around with a power drill to install screws. This approach worked really well when people were available to help and for relatively flat hull sections. I also needed to consider the time it took before mixing epoxy and completing panel installation as the ambient temperature in Brisbane is often around 30°C or even hotter, so that means a short working time of 20-30 minutes even with an extra slow hardener.

The bottom chine panels towards the bow, which needed to be twisted, were still installed as a single individual piece as it was easier to bend them this way and use clamps to ensure they conformed to the nice hull shape towards the bottom of the bow stem. For chine panels at the stern we also placed heavy weight blocks on top (attached with ropes).

Once all the panels were epoxied on the frames and stringers it was again time to pick up a plane and sanding blocks to shave off excess plywood and round the corners prior to taping the joins.


Saturday, October 30, 2021

Stringers

Good god, what can I say - I'm finalising this post more than a year after I worked on the stringers part of the boat build. In hindsight, I can say this was the most nerve-racking stage for me as an amateur boat builder. I worked on stringers between August and October 2021.

This is the part of the boat build where you really need to take your time and not rush it. Once the stringers are epoxied on the frames, that's it - you have your boat shape, and you want it to be true to the plans and symmetrical. 

I made a mistake with the first set of stringers I installed because I did not notch them into the frames enough. Thankfully a few experienced boatbuilders highlighted the problem for me and I was able to correct it early.

I recommend using a laser level if you can—even if you buy a cheap one online. A laser level on a tripod really helped me ensure that all the frames remained correctly aligned on the centreline while I was fitting the stringers.

Installing the stringers can be quite frustrating at times as nothing fits quite right naturally and your job is to make it fit. You may need to cut into the frames to, use wood rasps and other power tools to shave off timber at an angle that will make the stringers closely hug the frames and create a boat shape. The tools I used were: multitool with a variety of blades, hand saw, wood rasp... lots of swearing... some kind of magic or brute force.

You will need clamps, lots of clamps... there's never too many clamps. You will also need rope, quite a bit of it. The rope is very handy for this part as you can tie around the matching port and starboard stringers and, with a bit of cleverness, use the rope in a pulley system to bring the stringers in a very symmetrical fashion. This approach helped me keep the frames in alignment. If you're only trying to fit stringers on one side of the boat, you will find out that the forces of bending tend to shift frames out of alignment.

I started with the thin 30x22 stringers, as they are easiest to bend, followed by 50x22 strings on the chine line. With the bottom stringers, it was quite tricky to get them to sit nicely on the floor beams; you have to cut them down to a point where they join the bow knee. Lastly, I installed the 70x22 shearstrake (toerail) stringers.


Keel Fin

We drove about 120 km to Noosa to pick up my keel fin from John. Four Australian builders joined forces to engage a steel fabrication compan...